
Chromebook is a great device developed by Google for users who frequently use Google applications. It runs on Chrome Operating System and supports Linux as well as Android applications. However, errors such as DHCP Lookup Failed are diagnosed by the users.
What is DHCP Lookup Failed error?
For configuring the devices on IP networks, DHCP protocol is used. Several networks such as NTP and DNS that are based on TCP and UDP are enabled for use through this device. A hidden SSID, invalid frequency, damaged router firmware, or an outdated operating system can cause a DHCP lookup failed error. VPN, incompatible router may also form the base for this error to occur.
DHCP lookup failed error implies that the Chromebook or the computer is not able to connect to the IP address to the DHCP server.
Resolving DHCP lookup failed error
If the common issues such as a damaged router, or an outdated operating system are all in place, then it is important to understand the reason for the error. There are some tips and tricks through which this error can be resolved and the connection to the DHCP server can be formed again.
Some of these ways are listed below:
1. Restart the devices
When you are not able to connect to any of the networks and the DHCP lookup error is displayed, then the user can try restarting the network at the inception.
Every router is assigned an IP address. But at times it so happens that the router does not clear the table that contains all the IP address that has been initially assigned to it. And since this table is full, therefore the router is not able to assign a new IP address to it. So we need to clear this table for adding a new IP address. Instead of resetting it, we will simply shut down the device.
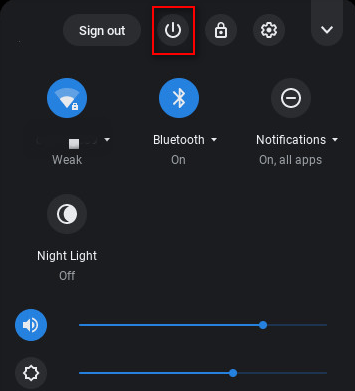
Shut down the Chromebook by clicking the power button. From the notification menu, select the tab shutdown. Or to completely shut down the Chromebook, the user can also press the power button for around 3 seconds till the LED goes off. Close the lid of the Chromebook, once the device is completely shut down. After this turn off the network router and ensure that all the power cables are plugged out.
After around 30 seconds, plug the power cables of the router again. Then turn on the router power. Once the router is stabilized, then switch on the Chromebook. Now try to connect to the network, the DHCP lookup failed error should have been resolved.
2. Update the operating system
The DHCP lookup failed error may have been also caused due to the outdated or the damaged version of the Chrome Operating system. This issue can be fixed by simply updating the firmware of the operating system. Also, when you update the firmware it removes all the bugs in the device and also curbs and solves the security issues. When you are trying to connect through the WiFi network and you get the error, then just connect through the Ethernet cable or if the Ethernet cable causes the error then connect through the WiFi network.
For updating the Chrome Operating system, firstly connect to the internet and then follow the below-mentioned steps:
- To open the notification menu, click on the Time icon placed on the bottom right corner.
- Search for the Chromebook settings after clicking on the Gear icon.
- Click on the option About Chrome OS displayed on the left pane of the computer.
- Click on the check updates button that is displayed on the right pane of the window. If any latest updates are available it gets downloaded and installed automatically.
After all, this process, reboot the computer or the device and check for the DHCP lookup failed error, it should have been resolved.
3. Using Google Name servers
The lack of communication between the IP address and the server is due to the DNS server. It so happens that the device fails to raise a query to the DNS server. And then the DHCP lookup failed error occurs. Therefore it is recommended to use Google Name servers.
- To open the notification menu click on the time icon that is located at the bottom right corner of the taskbar.
- To open the settings for Chrome click on the gear icon.
- You will find the WiFi option in the network section. Tap the right arrow of the same network that has an error for connection.
- When you scroll down on the next page, you find the Name servers option. Under this option select Google Name servers from the list that is displayed.
- With this process, the DHCP error gets resolved when you connect the WiFi network. If it is not yet resolved then restart the device and browse through the network settings of the page that displays the error. Click on the drop-down menu of the Name servers. Under that select Automatic name servers.
- Now when you connect again to the network, then the DHCP error should have been resolved.
- If the error still persists then browse through the network settings.
- Go to Configure IP address automatically option.
- Here enter the IP address of the Chromebook manually.
After completing all the processes, restart the device and the DHCP error should have been resolved.
4. Extending DHCP address range
Every router has a specific WiFi frequency. There is a strong possibility that the device that you use does not support the Wifi frequency. For the device to work efficiently, it becomes important that the device frequency and the WiFi router frequency matches each other. Therefore the device frequency should be changed manually.
It can be changed simply by:
- Browse through the Chrome Browser.
- Log in to the account at the web portal of the router you are using.
- Search for the Wireless settings tab.
- In this tab click on Change the band option.
- By default, the bandwidth should be 2.4 GHz. You should change this to 5 GHz and if it is 5 GHz then change that to 2.4 GHz.
- Save the changed settings and exit the menu.
- Once this is done restart the device.
The changed settings and bandwidth results in resolving the error of DHCP lookup failed.
5. WiFi Band frequency
The DHCP range is the determining factor for the number of devices to get an IP address from the router. Normally for a home network around 250 devices should be able to obtain the IP address from the router.
Changing the Bandwidth frequency resolves the DHCP lookup error. However, if the error still persists and you are not able to establish connectivity to the network, then one can also try by extending the range of addresses for the DHCP.
Increasing the range of DHCP address is done by following the simple step by step guide as mentioned below:
- Browse through the Chrome browser.
- Open the web portal of the router you are using.
- Once done, go to the DHCP tab settings in the portal.
- You can change the DHCP IP range by just manually changing the range option in the second box of the DHCP IP range. For instance, if the existing range is 192.168.1.200 then this can be changed to increase the address by 192.168.1.253.
- Once you change the range, save the settings.
- After saving the changed settings exit the browser.
By following the above-mentioned process, restart the device and the error is resolved
6. Reset the router
If restarting the device, updating the firmware and the operating system, increasing the DHCP range to add the number of devices does not solve the DHCP lookup error, then the last option that can be resorted to is reset the router.
Before resetting the router ensure that you have the default credentials handy with you. Also, be sure that if you need any User Id and password to set up the internet connection. When all the required information is noted down with you, then just reset the router by pressing and holding the reset button for 10 seconds. Once this is done log in on the router again. Follow the setup wizard for configuring the router again. This should resolve the DHCP error.
Solve DHCP lookup failed on Windows
The most common and popular way to resolve the network connection issues in Windows is to restart the computer. If still the error continues then check with the network settings:
- Press Windows Key + X.
- Out of the display screen select network connections.
- From the drop-down menu, change adaptor options.
- Select the available network adaptor Ethernet or WiFi whichever is available.
- Once you select the network adaptor, click on its properties and then double click on Internet Protocol Version 4.
- Ensure that the settings selected are set to obtain an IP address automatically.
Save the settings and close the window for properties. This resolves the error effectively.
Frequently asked Questions
Why does my Chromebook does not connect to the internet?
There are several reasons due to which the Chromebook does not connect to the internet. When such a thing happens then try simple solutions such as disconnecting and connecting the network again, updating the operating system and Chromebook, restart the router, etc.
How do I enable the DHCP server?
Enabling DHCP server is very simple:
- Open the DHCP server window.
- Select an interface from here.
- Select the network environment that is available for the DHCP server.
- For the adaptor configure a static IP address.
- After this configure DHCP settings.
- When everything is done, click on apply and close the window.
What does DHCP Lookup Failed mean on Chromebook?
The DHCP lookup failed error implies that the Chromebook or the computer is not able to obtain the IP address from the DHCP server. The IP address is required by any device such as mobile, Chromebook, or computer for establishing communication between router, internet, and the device. So this error implies that the connection is not effectively established.
How do I find my DHCP settings?
- Open the command prompt.
- With ipconfig, display the information for IP configuration
- Monitor the network adaptors that are DHCP enabled. While doing so the DHCP server can be identified when Lease obtained and the lease expired are shown.
Final Words: Solving DHCP Lookup Failed Error
The Linux-based device running on Chrome operating system, the Chromebook is one of the most efficient devices in the era. However, it does have hiccups and issues. The most common one being the connection to the wireless network. Though this is a frequent problem yet very simple to resolve. Some of the ways to resolve this issue include forgetting the wireless network, changing the sleep settings, disabling the WiFi extender, or updating the Chromebook and the operating system. Even Google’s network diagnostic tool can be sought to resolve the DHCP lookup failed error.